#arduino controlled robot
Explore tagged Tumblr posts
Visit Tumblr Blog
Explore Tumblr blogs with no restrictions, modern design and the best experience.
Last Seen Tumblr Blogs


Fun Fact
In 2020, 27% of US Tumblr users had an annual household income of over $100,000.
Video
youtube
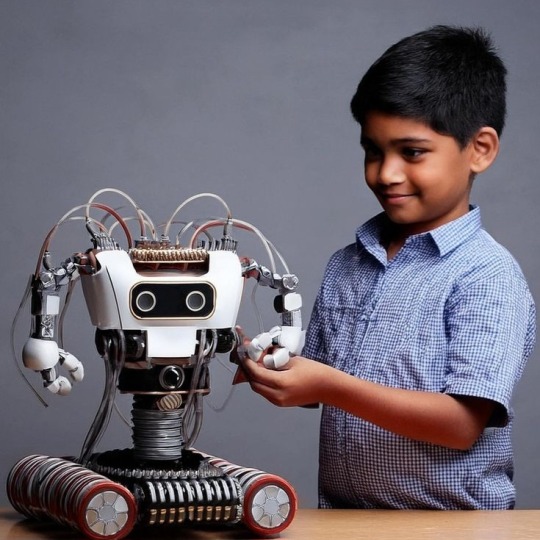
Wireless Hand Gesture Controlled Robot Using Arduino
#youtube#Wireless Hand Gesture Controlled Robot Using Arduino & Ultrasonic Sensor | Robotic Hand With Wireless Glove Controlled | NRF24L01 | Designin
0 notes
Text
Esplora Arduino game controller

The ESPLORA Arduino game controller Board is an Arduino-compatible microcontroller board based on the Arduino Leonardo. Unlike previous models, it comes equipped with a variety of built-in sensors for immediate use in interactions.
This guide is perfect for individuals interested in using Arduino, but who don’t want to dive into electronics right away. To learn how to use the ESPLORA Arduino game controller Board in a simple and clear manner, be sure to read the Getting Started with Esplora guide.
The ESPLORA Arduino game controller Board boasts onboard sound and light outputs, as well as multiple input sensors such as a joystick, slider, temperature sensor, accelerometer, microphone, and light sensor. Additionally, it offers the option to enhance its functions through two Tinker-kit input and output connectors and a socket for a color TFT LCD screen.
Similar to the Leonardo board, the ESPLORA Arduino game controller Board also utilizes an Atmega32U4 AVR microcontroller with a 16 MHz crystal oscillator. It features a micro USB connection that can function as a USB client device, such as a mouse or keyboard. Additionally, there is a reset push button located in the upper left corner of the board for restarting purposes.
There exist four indicators, each displaying a different status.
The green indicator shows if the board is currently being powered.
The L [yellow] connects directly to pin 13 on the micro-controller for easy accessibility.
The [yellow] LED indicates data being transmitted or received through the USB connection.
Within the board lies all the necessary components to support the microcontroller. To begin, just connect it to a computer using a USB cable. The ESPLORA Arduino game controller Board is also equipped with built-in USB communication, allowing it to function as a mouse or keyboard when connected to a computer. It also offers a virtual serial/COM port (CDC). This alters the behavior of the board, which is further explained on our getting started page. On this page, you can find all the instructions for configuring your board and utilizing the Arduino Software (IDE) for coding and electronics experimentation.
The transfer of data, both in and out.
The ESPLORA Arduino game controller Board features a classic gamepad design, including an analog joystick on the left and four push buttons on the right. It also comes equipped with several onboard inputs and outputs:
The analog joystick features a center push-button and two axes, designated as X and Y. There is also a central pushbutton for added functionality.
Arranged in a diamond formation are 4 push-buttons.
The slider for the linear potentiometer is located towards the bottom of the board.
A tool to capture the volume (amplitude) of the surrounding environment.
A sensor that detects light to measure brightness.
The temperature sensor measures the surrounding temperature.
A three-axis accelerometer detects the orientation of the board with respect to gravity, along the X, Y, and Z axes.
The buzzer has the ability to generate square-wave tones.
The RGB LED features Red, Green, and Blue elements that allow for color mixing and a bright display.
The TinkerKit Inputs allow for easy connection between the sensor modules and 3-pin connectors.
The TinkerKit Outputs allow for easy connection of the TinkerKit actuator modules via the 3-pin connectors.
The TFT display connector can be used for a color LCD screen, SD card, or any other devices utilizing the SPI protocol.
To fully utilize all available sensors, the board employs an analog multiplexer. This way, multiple input channels (excluding the 3-axis accelerometer) can share a single analog input of the microcontroller. Selecting which channel to read is done through four additional pins on the microcontroller.
Communication is essential in any relationship, whether it be personal or professional. It plays a crucial role in maintaining strong connections and fostering understanding between individuals. Effective communication allows for open and honest dialogue, facilitating problem-solving and building trust. Without good communication, misunderstandings can occur, leading to conflicts and strained relationships. Therefore, it is important to prioritize effective communication in every aspect of our lives.
The ESPLORA Arduino game controller Board for the Leonardo offers various features for connecting with a computer, another Arduino, or different micro-controllers. The ATmega32U4 enables serial (CDC) communication through USB and is recognized as a virtual com port on the computer. It also functions as a full speed USB 2.0 device and can be used with standard USB COM drivers. A .inf file is needed for Windows.
The Arduino software comes equipped with a serial monitor for easy transmission of text data to and from the board. Whenever data is being sent via the USB connection to the computer, the RX and TX LEDs will light up on the board. Additionally, the ATmega32U4 has SPI capability accessible through the SPI library. In addition, the Esplora can act as a standard keyboard and mouse, allowing you to use programming to manage these input devices via the Keyboard and Mouse libraries.
The act of creating computer software, also known as programming, involves writing code using various languages and tools. This process requires a combination of problem-solving skills, critical thinking and creativity. Programmers must constantly learn new techniques and adapt to ever-changing technology in order to produce high-quality programs.
To start using the Esplora with your Arduino software (download), simply choose “Esplora” from the Tools > Board menu. For more information, refer to the getting started page. The ATmega32U4 on the Esplora comes pre-loaded with a boot-loader, enabling you to upload new code without an external hardware programmer.
The AVR109 protocol is the chosen method of communication. To avoid using the bootloader, you can program the microcontroller through the ICSP header. Additional instructions are available for reference.
A dedicated library for the Esplora simplifies writing sketches, with methods available for reading sensors and controlling onboard outputs. These high-level methods also perform pre-processing of data, such as converting temperature readings to degrees Fahrenheit or Celsius. Additionally, the library allows easy access to outputs like the RGB LED. For further information and examples, please refer to the Esplora library reference page.
The automatic reset and bootloader activation are key components in the software’s functioning.
Rather than relying on the physical reset button, the Esplora utilizes a software-based reset triggered by opening and then closing the virtual serial/COM port (CDC) at 1200 baud. This initiates a processor reset, temporarily cutting off the USB connection to the computer and causing the virtual port to disappear. The boot-loader remains active for approximately 8 seconds before it can also be activated by pressing the reset button on the Esplora.
Please be aware that upon initial power up, the board will launch the user sketch instead of the boot-loader, if available. Due to the specific reset process of the Esplora, it is most effective to allow the Arduino software to attempt a reset before uploading, especially if you typically press the reset button before uploading on other boards. However, in the event that the software is unable to reset the board, you can manually initiate the boot-loader by pressing the reset button on the board.
The USB port is equipped with overcurrent protection to prevent any potential damage.
The ESPLORA Arduino game controller Board comes equipped with a re-settable poly-fuse to safeguard your computer’s USB ports against shorts and over-current. While most computers have built-in protection, the fuse adds an additional level of security. In the case of a short or overload exceeding 500 mA, the fuse will disconnect the connection until the issue is resolved.
Regarding the appearance of this object, its external features will be discussed.
The ESPLORA Arduino game controller Board PCB has a maximum size of 6.5 inches in length and 2.4 inches in width. The USB and TinkerKit connectors extend beyond the width dimension. Additionally, there are four screw holes that allow for attachment to a surface or case.
1 note
·
View note
Text
Ad | Some Humble Bundle Goodies
One for the audio engineers - The Audio Arcade bundle gives you a whole bunch of royalty-free music and SFX as well as plugins to insert in all the major game engines. Ambient tracks, environmental sounds, explosions, you name it.
Money raised goes towards Children's Miracle Network Hospitals.
For those who dabble in Virtual Reality, the Upload VR Showcase with Devolver Digital has a bunch of Serious Sam VR games as well as the Talos Principle, a really solid puzzle game.
Money raised goes to Special Effect which helps people with disabilities enjoy games via accessible controllers. I've seen the stuff they do and it's honestly great.
Want to get into programming but don't know where to start? The Learn to Program bundle has a tonne of resources covering everything from HTML and CSS through to Python, C# and Ruby.
Money raised goes towards Code.org which seeks to expand participation in computing science by helping women and students of colour.
The Future Tech Innovators Toolkit is a software bundle with courses on Robotics, Electronics and programming with Raspberry Pi and Arduino.
Money raised goes towards Alzheimers Research UK.
The Home How-To Guides bundle offers a complete set of books for home improvements and projects. Want to know more about plumbing, home repair, bathrooms, wiring or carpentry? This bundle has you covered.
Money raised goes to It Gets Better, a charity that supports LGBT Youth.
Want to pick up the latest Elden Ring DLC? It's also available on the Humble Store with the key being redeemable on Steam.
105 notes
·
View notes
Text


Piccorobo by Vstone, Osaka (2015). "Piccorobo is an introductory bipedal robot equipped with Freaduino UNO, which is compatible with Arduino UNO. It has a simple configuration with four servo motors, and can perform movements such as walking and swinging its head. … You can have fun learning how to use Arduino and control robots."
11 notes
·
View notes
Text
On one hand, I hate my robotics teacher for teaching us the same lesson on python loops we've been learning for half the damn school year, then expecting us to make an innovative robot in 3 weeks when arduino is based on C++.
I was gonna counter that with something else, but as I wrote it I realized just how stupid it actually is. Fuck it. Venting time.
NO CUZ I CAN'T UNDERSTAND THIS GUY. WDYM "Programming's easy! You learn the basics, and from there you make your own solutions." ??? That's not verbatim but. STILL.
I'll give him a bit of credit, he taught us the basics of arduino. The proper syntax, loops, variables, functions, motor control, sensors, etc. But for god's sake, that limited pool of knowledge can only get you enough to make a mini car! It would've been nice to learn about fading LEDs, integer overflow, pointers vs the actual value in a variable, OR EVEN WHAT DOCUMENTATION IS. YEAH. DOCUMENTATION. THE LITERAL OFFICIAL EXPLANATION FOR KEY FEATURES IN PROGRAMMING LANGUAGES.
But suddenly its OUR fault our code doesn't work because "I taught you the basics. If you don't understand, that means you're not listening during my classes." MAYBE IF YOU STOPPED TEACHING US WHAT A FUCKING FOR LOOP IS, WE'D HAVE A REASON TO LISTEN. Majority of my understanding of robotics are a product of self study and receiving help from my family and their long list of IT contacts.
Not only that, HE is the one that approves of our robotics projects. If YOUR students can't complete the project YOU personally approved of, isn't that an error on your part? You should know what your students are capable of making. You should know because they should only know WHAT YOU TEACH THEM. So surprise surprise when your students feel like they're forced to hire people to do their projects, all because of your failure to teach them the skills they needed to do it themselves.
The only people getting a passing grade in this class are gonna be those that are either rich or have a lot of contacts. What a fucking joke.
And don't be mistaken, this is NOT the complaint of someone who doesn't understand programming. I consistently get 90% and above on his exams and do coding for fun. I'm complaining on behalf of my classmates who weren't as lucky as me, in that I have way more people to ask help from.
"100% working by this week" my ass. Actually teach us something relevant for once.
#dumb ramblings#vent post#ough#for the record i do like coding in python#i prefer it over C++ actually#But none of our projects use python#so I don't know what's going on in my teacher's head...
4 notes
·
View notes
Text
Gear Up! A Beginner's Guide to Learning Robotics
Hey Tech Enthusiasts!
Are you fascinated by robots and want to dive into the world of robotics? Learning robotics can seem daunting, but with the right resources and mindset, you can get started!
Step 1: Understand the Basics
- Familiarize yourself with programming languages like C++, Python, or Java
- Learn about electronics, circuitry, and microcontrollers (e.g., Arduino, Raspberry Pi)
- Get a grasp on mechanical concepts (e.g., kinematics, dynamics)
Step 2: Choose Your Path
- Robotics kits (e.g., Lego Mindstorms, Makeblock)
- Online courses (e.g., Coursera, edX, Udemy)
- Books (e.g., "Robotics, Vision & Control" by Peter Corke)
- Join online communities (e.g., Reddit's r/robotics, r/learnprogramming)
*Step 3: Practice & Build*
- Start with simple projects (e.g., line follower, robotic arm)
- Experiment with sensors, actuators, and control systems
- Join robotics competitions or hackathons
Step 4: Network & Learn from Others
- Attend robotics conferences, meetups, or workshops
- Collaborate with fellow robotics enthusiasts
- Participate in online forums
Resources:
- Code.org's Robotics Course
- Robotics Academy
- Robot Operating System (ROS)
Inspiration:
- Boston Dynamics' robots
- NASA's Robotics Alliance Project
- Robot Wars
Conclusion:
Learning robotics takes time, patience, and dedication. Stay curious, persistent, and creative!
What's your favorite robotics project or resource? Share in the comments!
[Reblog if you're interested in robotics!]
3 notes
·
View notes
Text
Top 10 Projects for BE Electrical Engineering Students
Embarking on a Bachelor of Engineering (BE) in Electrical Engineering opens up a world of innovation and creativity. One of the best ways to apply theoretical knowledge is through practical projects that not only enhance your skills but also boost your resume. Here are the top 10 projects for BE Electrical Engineering students, designed to challenge you and showcase your talents.
1. Smart Home Automation System
Overview: Develop a system that allows users to control home appliances remotely using a smartphone app or voice commands.
Key Components:
Microcontroller (Arduino or Raspberry Pi)
Wi-Fi or Bluetooth module
Sensors (temperature, motion, light)
Learning Outcome: Understand IoT concepts and the integration of hardware and software.
2. Solar Power Generation System
Overview: Create a solar panel system that converts sunlight into electricity, suitable for powering small devices or homes.
Key Components:
Solar panels
Charge controller
Inverter
Battery storage
Learning Outcome: Gain insights into renewable energy sources and energy conversion.
3. Automated Irrigation System
Overview: Design a system that automates the watering of plants based on soil moisture levels.
Key Components:
Soil moisture sensor
Water pump
Microcontroller
Relay module
Learning Outcome: Learn about sensor integration and automation in agriculture.
4. Electric Vehicle Charging Station
Overview: Build a prototype for an electric vehicle (EV) charging station that monitors and controls charging processes.
Key Components:
Power electronics (rectifier, inverter)
Microcontroller
LCD display
Safety features (fuses, circuit breakers)
Learning Outcome: Explore the fundamentals of electric vehicles and charging technologies.
5. Gesture-Controlled Robot
Overview: Develop a robot that can be controlled using hand gestures via sensors or cameras.
Key Components:
Microcontroller (Arduino)
Motors and wheels
Ultrasonic or infrared sensors
Gesture recognition module
Learning Outcome: Understand robotics, programming, and sensor technologies.
6. Power Factor Correction System
Overview: Create a system that improves the power factor in electrical circuits to enhance efficiency.
Key Components:
Capacitors
Microcontroller
Current and voltage sensors
Relay for switching
Learning Outcome: Learn about power quality and its importance in electrical systems.
7. Wireless Power Transmission
Overview: Experiment with transmitting power wirelessly over short distances.
Key Components:
Resonant inductive coupling setup
Power source
Load (LED, small motor)
Learning Outcome: Explore concepts of electromagnetic fields and energy transfer.
8. Voice-Controlled Home Assistant
Overview: Build a home assistant that can respond to voice commands to control devices or provide information.
Key Components:
Microcontroller (Raspberry Pi preferred)
Voice recognition module
Wi-Fi module
Connected devices (lights, speakers)
Learning Outcome: Gain experience in natural language processing and AI integration.
9. Traffic Light Control System Using Microcontroller
Overview: Design a smart traffic light system that optimizes traffic flow based on real-time data.
Key Components:
Microcontroller (Arduino)
LED lights
Sensors (for vehicle detection)
Timer module
Learning Outcome: Understand traffic management systems and embedded programming.
10. Data Acquisition System
Overview: Develop a system that collects and analyzes data from various sensors (temperature, humidity, etc.).
Key Components:
Microcontroller (Arduino or Raspberry Pi)
Multiple sensors
Data logging software
Display (LCD or web interface)
Learning Outcome: Learn about data collection, processing, and analysis.
Conclusion
Engaging in these projects not only enhances your practical skills but also reinforces your theoretical knowledge. Whether you aim to develop sustainable technologies, innovate in robotics, or contribute to smart cities, these projects can serve as stepping stones in your journey as an electrical engineer. Choose a project that aligns with your interests, and don’t hesitate to seek guidance from your professors and peers. Happy engineering!
5 notes
·
View notes
Note
hi. robotics question: i want an electric motor that receives input to control its force, and outputs its position. im kinda confused with different kinds of motors. controlling force is easy, right?
in terms of scale, im talking about an arduino prototype so pretty small but im fine if the motor is big enough to have its own power cable.
yeah im a programmer i dont know much about hardware :p
someone please fix me if i'm wrong, FRC uses a pretty self-contained ecosystem so I actually have no prior knowledge to answer this lol
but! based on some research, it sounds like torque control in a DC motor can be achieved by limiting the current to the motor (versus speed control, by setting voltage).[1][2] look for brushed DC motors with built-in encoders, that's the part that will tell you the motor's position. encoders can be absolute (tells you where the rotor is wrt some fixed "zero" position, consistent across power cycles) or relative/incremental (just tells you how far you've gone since you started/that you've taken a step). i'm not sure what kind of circuitry you might need to handle the current control, although looking for something marketed for arduino makes sense as a first step.[3]
there are also AC motors, brushless DC (BLDC) motors, and stepper motors, and they all have more complex control schemes that I know next to nothing about!
[1] https://electronics.stackexchange.com/questions/420289/torque-and-speed-control-of-a-dc-motor [2] https://control.com/forums/threads/how-can-i-control-a-dc-motors-torque.14793/ [3] https://forum.arduino.cc/t/dc-motor-control-using-current-sensing/434545/5
5 notes
·
View notes
Text
The PAJ7620 is a highly capable gesture recognition sensor. It can detect a wide range of gestures such as up, down, left, right, forward, backward, and more. The sensor uses an array of infrared LEDs and a photodiode array to detect motion in its field of view. It communicates with a microcontroller (like Arduino) over the I2C interface, making it a versatile option for many gesture-controlled applications.
1 note
·
View note
Text
Essential Electronic Items for IoT and Electronics Enthusiasts
Are you diving into the world of Internet of Things (IoT) and electronics? Whether you are a seasoned engineer or simply beginning out, having a stable list of essential components is key to bringing your initiatives to existence. Here’s a curated list of electronic objects that each maker and tech enthusiast ought to have of their toolkit:
1. Microcontrollers
Arduino Uno: Great for novices and versatile for diverse projects.
Raspberry Pi: Ideal for more complex duties and going for walks complete operating structures.
ESP8266/ESP32: Perfect for wireless communication and IoT projects.
2. Sensors
DHT22: For temperature and humidity readings.
PIR Sensor: Useful for movement detection.
Ultrasonic Distance Sensor: Measures distances with high accuracy.
3. Actuators
Servo Motors: For unique manage in robotics and mechanical structures.
Stepper Motors: Ideal for applications requiring particular movement.
Solenoids: Good for growing mechanical actions and locks.
4. Displays
LCD Display: Useful for showing records and debugging.
OLED Display: Compact and clean for exact photographs and texts.
5. Connectivity Modules
Bluetooth Module (HC-05/HC-06): For short-range wi-fi communication.
Wi-Fi Module (ESP8266): Connects gadgets to the internet.
GSM Module: Enables verbal exchange over mobile networks.
6. Power Supplies
Battery Packs: Various types for transportable electricity.
Voltage Regulators: Ensure solid voltage ranges in your circuits.
Power Banks: Handy for charging and powering devices on the move.
7. Prototyping Tools
Breadboards: Essential for prototyping with out soldering.
Jumper Wires: For making connections on breadboards.
Soldering Kit: For everlasting connections and circuit meeting.
eight. Additional Components
Resistors, Capacitors, and Diodes: Fundamental for circuit design and stability.
Transistors: Key for switching and amplification tasks.
Connectors and Switches: For interfacing and controlling circuits.
By preserving these objects handy, you'll be nicely-prepared to address a huge range of IoT and electronics projects. Whether you're constructing smart domestic devices, wearable tech, or computerized structures, having the right additives can make all the difference.
#IoT#Electronics#Arduino#RaspberryPi#ESP32#Sensors#Actuators#Displays#ConnectivityModules#PowerSupplies#Prototyping#Tech#DIY#Makers#Engineering#ElectronicComponents#TechProjects
2 notes
·
View notes
Text
Robotics Project Ideas for All Skill Levels: From Beginner to Advanced
Beginner Projects
Line Following Robot
Description: A robot that follows a pre-defined path marked by a line on the floor. The line can be of any color, but black on a white background is commonly used.
Components: Microcontroller (like Arduino), IR sensors, DC motors, motor driver, chassis, wheels.
Learning Outcomes: Basic electronics, sensor integration, and motor control.
Obstacle Avoidance Robot
Description: A robot designed to navigate its environment and avoid obstacles. It uses sensors to detect objects in its path and changes direction to avoid collisions.
Components: Ultrasonic sensors, microcontroller, motors, motor driver, chassis, wheels.
Learning Outcomes: Understanding of sensor data processing, basic programming, and control systems.
Bluetooth-Controlled Robot
Description: A robot that can be controlled via a smartphone or other Bluetooth-enabled devices. Commands are sent wirelessly to move the robot in different directions.
Components: Bluetooth module, microcontroller, motors, motor driver, chassis, wheels.
Learning Outcomes: Wireless communication, mobile app development, microcontroller programming.
Voice-Controlled Robot
Description: A robot that responds to voice commands, allowing you to control its movements through spoken instructions.
Components: Microphone, speech recognition module, microcontroller, motors, motor driver, chassis, wheels.
Learning Outcomes: Introduction to speech recognition, interfacing sensors, and control mechanisms.
Light Following Robot
Description: A robot that follows a light source. It can be used to follow a flashlight or navigate toward a lighted area.
Components: Light sensors, microcontroller, motors, motor driver, chassis, wheels.
Learning Outcomes: Sensor integration, basic electronics, programming.
Before next read this Robotic Revolution
Intermediate Projects
Self-Balancing Robot
Description: A robot that maintains its balance on two wheels, similar to a Segway. It uses sensors to detect its tilt and adjusts the motors to stay upright.
Components: Gyroscope, accelerometer, microcontroller, motors, motor driver, wheels.
Learning Outcomes: Understanding of feedback control systems, sensor fusion, and motor control.
Robotic Arm
Description: A robotic arm capable of performing simple tasks like picking and placing objects. It can be controlled manually or programmed to follow a sequence of movements.
Components: Servo motors, microcontroller, various sensors (like pressure or touch), structural components.
Learning Outcomes: Kinematics, servo control, programming for sequential tasks.
Maze-Solving Robot
Description: A robot that can navigate through a maze and find the exit. It uses algorithms to decide the best path and avoid dead ends.
Components: IR or ultrasonic sensors, microcontroller, motors, motor driver, chassis, wheels.
Learning Outcomes: Algorithm implementation, sensor data interpretation, navigation strategies.
Remote-Controlled Spy Robot
Description: A small robot equipped with a camera that can be controlled remotely to explore and send live video feed.
Components: Wireless camera, microcontroller, motors, motor driver, chassis, wheels, remote control.
Learning Outcomes: Wireless video transmission, remote control systems, motor and sensor integration.
Line Following Robot with Obstacle Detection
Description: A robot that not only follows a line but also detects and avoids obstacles on its path. It combines line following and obstacle avoidance features.
Components: IR sensors, ultrasonic sensors, microcontroller, motors, motor driver, chassis, wheels.
Learning Outcomes: Integration of multiple sensor data, complex programming logic, advanced control systems.
Advanced Projects
Humanoid Robot
Description: A robot designed to resemble a human body. It can perform tasks like walking, speaking, and interacting with its environment.
Components: Servo motors, microcontroller, sensors (accelerometer, gyroscope), structural components.
Learning Outcomes: Advanced kinematics, complex control algorithms, humanoid robotics.
Autonomous Delivery Robot
Description: A robot that can autonomously navigate to deliver packages within a designated area. It uses GPS and other sensors to determine its location and avoid obstacles.
Components: GPS module, ultrasonic sensors, camera, microcontroller, motors, motor driver, chassis, wheels.
Learning Outcomes: Autonomous navigation, path planning, integration of multiple sensors.
Robotic Exoskeleton
Description: A wearable robotic suit that can assist with movement, enhancing the strength and endurance of the user.
Components: Servo motors, sensors (like pressure, motion), microcontroller, structural components.
Learning Outcomes: Biomechanics, actuator control, wearable robotics.
Quadruped Robot
Description: A four-legged robot capable of walking, running, and navigating various terrains. It mimics the movement of animals like dogs or cats.
Components: Servo motors, microcontroller, sensors (accelerometer, gyroscope), structural components.
Learning Outcomes: Gait analysis, dynamic stability, complex movement programming.
Swarm Robotics
Description: A group of small robots that work together to complete tasks. They communicate and coordinate to achieve goals like collective exploration or object transport.
Components: Multiple small robots, communication modules, microcontroller, various sensors.
Learning Outcomes: Distributed systems, communication protocols, cooperative robotics.
2 notes
·
View notes
Text
Arduino Due vs. Mega: A Comprehensive Comparison
What is Arduino Due and Mega?
The Arduino platform has revolutionized the world of DIY electronics, providing hobbyists and professionals alike with versatile and powerful microcontroller boards. Among the myriad of options, the Arduino Due and Arduino Mega stand out for their advanced features and robust performance. The Arduino Due, introduced in 2012, is the first Arduino board based on a 32-bit ARM core microcontroller, the Atmel SAM3X8E. In contrast, the Arduino Mega, built around the 8-bit ATmega2560 microcontroller, is known for its abundant I/O pins and memory. Understanding the differences between these two boards can help in selecting the right one for specific projects, enhancing both functionality and efficiency.
Processing Power and Performance
The processing capabilities of the Arduino Due and Mega are distinctly different, primarily due to their core microcontrollers. The Arduino Due, with its 32-bit ARM Cortex-M3 processor running at 84 MHz, offers significantly higher processing power compared to the Arduino Mega's 8-bit ATmega2560, which operates at 16 MHz. This difference in architecture and clock speed means that the Due can handle more complex calculations and tasks faster and more efficiently than the Mega. For projects requiring high computational power, such as real-time data processing or handling multiple sensors simultaneously, the Due is the superior choice. However, for simpler tasks, the Mega's processing power may suffice.
Memory and Storage Capabilities
Memory is another critical aspect where the Arduino Due and Mega diverge. The Arduino Due is equipped with 512 KB of flash memory for code storage and 96 KB of SRAM for data. On the other hand, the Arduino Mega has 256 KB of flash memory and 8 KB of SRAM. Additionally, the Due features a Direct Memory Access (DMA) controller, which allows for efficient memory operations, freeing up the CPU to handle other tasks. These memory enhancements make the Due more suitable for applications requiring large codebases and significant data handling, such as advanced robotics or sophisticated control systems. The Mega, with its more modest memory, is ideal for less demanding applications.
Input/Output Capabilities and Expansion
Both the Arduino Due and Mega are renowned for their extensive input/output (I/O) capabilities, yet they cater to different needs. The Mega boasts a whopping 54 digital I/O pins, 16 analog inputs, and 4 UARTs, making it ideal for projects that require multiple sensors, actuators, or communication interfaces. The Due, while offering fewer digital I/O pins at 54, includes 12 analog inputs and 4 UARTs, along with additional features like two DAC outputs for analog signal generation and enhanced PWM capabilities. These features provide the Due with superior analog output capabilities, making it suitable for applications like audio processing or advanced signal generation.
Power Consumption and Compatibility
Power consumption and compatibility are practical considerations when choosing between the Arduino Due and Mega. The Due operates at 3.3V logic levels, which makes it more power-efficient than the Mega, which uses 5V logic levels. This lower voltage operation is beneficial for battery-powered projects where energy efficiency is crucial. However, the 3.3V logic also means that the Due is not directly compatible with 5V components without level shifters. The Mega, with its 5V logic, offers broader compatibility with existing Arduino shields and components, making it a versatile choice for a wide range of projects. Understanding these power and compatibility nuances can help in making an informed decision based on the project's specific requirements.
2 notes
·
View notes
Text
DeerHead EMC-V1 baby pictures.. She doesn't even have all of her leg servos yet 🥺 (EMC stands for "Electro-Mechanical Chihuahua"!)


Her snout is a bit huge for this first run, but really this is just a draft while the 3D printer is broken; the LED matrix in her head was also defective right out of the package, as it turns out; so because it's also a little heavy, I probably won't end up using it! That's okay because atleast for the Arduino Uno, running both 15 servoes and the 64 pixel screen animations at once could be a bit much! I'm thinking of getting the hardware up and at 'em first, and making sure that I can program it to say, do a little dance for now to show that I'm up for the challenge of animating servoes with this driver library (right now I'm just testing with a live servo control program), and then I want to upgrade to a Raspberry Pi brain so that I can start giving her autonomy! When I do that, I'm going to atleast want two buttons; a back and head button to sense affection and love! Or scoulding with a tap on the head, but that might be much to program for something I'd never really need to do with a robot I programmed XD unless it ended up being more autonomous than I'm realisitcally imagining it being! I'll also want a gyro sensor, so that she'll be able to tell if she's fallen over (maybe combined with soft buttons on her front paws sensing that they aren't touching the ground), and self-right! She will also have a distance sensor on her chest to avoid bumping into things, and for a general sense of depth; and beside that, a microphone (connected to a voice recognition module? I feel like Raspberry Pi wouldn't need that, I haven't looked into it though), to understand voice commands.. Or just "I love you" whilst receiving cuddles 😄 and of course, there would be a speaker, likely in the back of the head or also near the distance sensor depending on the size; for this maybe I can use some old furby boom parts I have laying around 😆 I'd probably need a module for the speaker though, so the Pi knows it's a speaker, and that'd probably come with another speaker.. And to power it all? A six volt LIPO battery! Or would six volts be anywhere near enough for all that combined with running the programming of the robot? Such I'd have to research lol, but furthermore.. I welcome EMC-V1 to the world!!! And tomorrow my new servoes will come in, hopefully she'll be able to walk too by then 😄
5 notes
·
View notes
Text
Top 10 Scale Gifts for the Gadget Enthusiast
Finding the ideal present for the gadget lover in your life may be thrilling and difficult at the same time because technology is continuously changing, and gadgets are becoming an essential part of our lives. The appropriate gadget may make their world come alive, whether it's for a birthday, an anniversary, or to express gratitude. We've put together a list of Top 10 Scale Gifts for the Gadget Enthusiast to aid you in your search for the perfect present.
High-end headphones
There's nothing quite like immersing yourself in music or podcasts with a pair of high-quality headphones. For the audiophile in your life, consider options like the Bose QuietComfort 35 II or Sony WH-1000XM4. These headphones not only offer exceptional sound quality but also come with noise-canceling features, making them perfect for music lovers on the go.
Smartwatch or Fitness Tracker
Smartwatches and fitness trackers have become more than just timekeeping devices; they're personal assistants for tracking health and staying connected. Due to their abundance of health and fitness capabilities, app compatibility, and stylish designs, the Apple Watch Series 7 and Fitbit Versa 3 are both fantastic options.
Drone
Drones have taken the world by storm, offering a unique perspective and endless possibilities for creativity. DJI's Mavic Air 2 and Skydio 2 are top-notch options, equipped with high-resolution cameras, obstacle avoidance, and impressive flight capabilities. A drone is an excellent gift for both tech enthusiasts and photography lovers.
Virtual Reality (VR) Headset
Step into another world with a VR headset. Oculus Quest 2 and Valve Index provide immersive gaming experiences and access to virtual reality applications. VR headsets are perfect for those who crave a new level of entertainment and want to explore virtual realms.
High-Performance Laptop
A powerful laptop is essential for the tech enthusiast who wants power on the run. Choose laptops are notorious for their exceptional speed, stunning defenses, and portability, similar as the MacBook Pro or Dell XPS 15. These laptops work well for a variety of operations, including videotape editing and programming.
Smart Home Devices
Transforming a house into a smart home is a trend that continues to gain momentum. Smart home devices like Amazon Echo, Google Nest, and Philips Hue lights offer convenience and automation. They allow control over lights, music, security, and more with just a voice command or a tap on your smartphone.
Streaming Device
Cutting the cord has never been more accessible with streaming devices like Roku Ultra and Apple TV 4K. These devices offer access to a vast library of streaming services, including Netflix, Disney+, and Hulu, in stunning 4K quality. Streaming devices are perfect for binge-watchers and movie buffs.
High-Resolution Camera
Capture life's moments in stunning detail with a high-resolution camera. The Sony Alpha a7R IV and Canon EOS R5 are recognized for their superb image quality and adaptability. For photographers who want to capture landscapes, portraiture, or wildlife, these cameras are perfect.
Gaming Console or Accessories
Gaming is a passion for many gadget enthusiasts. Consider the latest gaming consoles like the PlayStation 5 or Xbox Series X. Enhance the gaming experience with accessories like gaming chairs, mechanical keyboards, or gaming headsets.
Tech Toolkit or DIY Electronics Kit
For those who love to tinker and build, a tech toolkit or DIY electronics kit is the perfect gift. Arduino Starter Kits and Raspberry Pi Bundles provide endless opportunities for creating gadgets, robots, and electronic projects.
Conclusion
In conclusion, it need not be difficult to select the ideal present for a gadget fanatic. With the top 10 scale gifts we've outlined, you can surprise your loved one with a thoughtful and exciting present that aligns with their passion for technology. Remember, the best gift is one that shows you know their interests and cater to their tech-savvy side.
2 notes
·
View notes
Text
EXPLORING THE 5 COOL PARTNER SELLER ELECTRONICS PRODUCTS-Part1
Exploring the 5 Cool Partner Seller Electronics Products
Prologue
Are you an electronics enthusiast looking to expand your electronics project repertoire? Want to take your skills to the next level by exploring new and exciting products? Look no further than our list of five cool electronics products from partner sellers!
Whether you’re interested in building your own smart home devices, experimenting with sensors, or creating your own robot, these products are sure to inspire you. They cover a lot of application areas, from loop detectors used to monitor vehicle count in parking garages to Arduino CNC shields used in CNC machines, from simple pulse sensors used to detect cardiovascular pulse signals from fingertip to RGB LED panel light used in smart home, these products are unique, compact, and functional. Not only are these products fun to build and use but they’re also designed to help you learn new skills and techniques along the way.
What’s more, these products all come from trusted partner sellers who are committed to developing high-quality products. They’re happy to provide technical support for customers who have questions, so you can be sure you’re getting the best in electronics.
So get ready to dive into the world of electronics and explore these five cool partner seller products. You’re sure to find something that piques your interest and takes your own electronics projects to the next level.
Inductive Loop Vehicle Detector by Elektronika-ba
Whether you need to monitor occupancy and count vehicles in parking garages, control vehicle access at door and barrier controls, or facilitate traffic light installations and traffic controllers, the inductive loop detector is the perfect solution. It can even detect the direction and speed of vehicle traffic, making it an invaluable tool for a variety of traffic-related applications. In addition, this device can function as a stand-alone speed trap and can be easily interfaced with Arduino.
We can also provide a pre-programmed PIC chip to meet your project requirements.
Specifications
Number of operating modes: 4
Tuning: Automatic
Detection type: Presence/Pulse
Presence time: Adjustable in 3 steps
Pulse duration: 250 ms / 500 ms
Signal filtering: Adjustable in 2 steps (NORMAL, HIGH)
Loop inductance: 20 uH — 1000 uH
Frequency range: 20 kHz — 145 kHz
Frequency selection: 2 combinations (LOW, HIGH)
Sensitivity: Maximum 0.0025% Δf/f, adjustable in 8 steps
Detection speed: 10 ms by default, adjustable
Start-up time: ~ 1 second per channel (or longer if the frequency is not stable)
Temperature range: -35°C — 120°C
Sensor protection: Galvanic isolation + gas discharge tube for lightning protection
Don’t settle for less — click here to learn more about the Inductive Loop Vehicle Detector and experience the compact, yet cool detector!
Arduino CNC Shield V3.51 by Protoneer
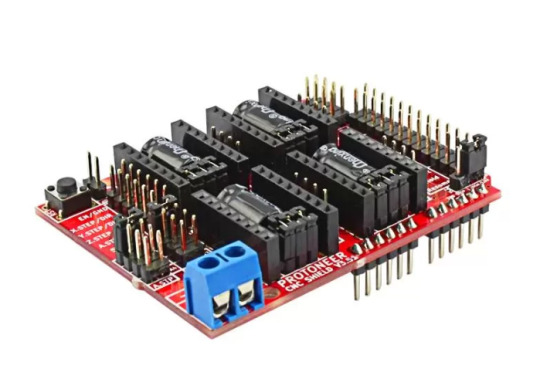
Designed by Protoneer, this kit is packed with features to ensure high precision control of your stepper motors, you can use it to easily build small CNC routers, DIY laser cutters, 3D printers, or any project that requires precise stepper motor control.
Our latest version 3.51 includes several enhancements to make assembly and installation even easier. We’ve added end-stop and probe signal filtering circuitry to eliminate false triggers and allow the use of unshielded cables for end-stops and probes. We’ve also increased the size of the solder pads for easier assembly and updated the probe pin labels to make installation a breeze.
With the Arduino CNC Shield Kit, you’ll have everything you need to build your own CNC router or mill with ease.
Features
Includes Noise Filers on all end stops and the probing pin. (New in V3.51)
GRBL 0.9 compatible. (Open source firmware that runs on an Arduino UNO that turns G-code commands into stepper signals https://github.com/grbl/grbl)
4-Axis support (X, Y, Z, A-Can duplicate X, Y, Z or do a full 4th axis with custom firmware using pins A4 and A3)
2 x End stops for each axis (6 in total)
Coolant enable
Uses removable Pololu A4988 compatible stepper drivers. (A4988, DRV8825 and others)(Not Included)
Jumpers to set the Micro-Stepping for the stepper drivers. (Some drivers like the DRV8825 can do up to 1/32 micro-stepping )
Compact design.
Stepper Motors can be connected with 4-pin molex connectors or soldered in place.
Runs on 12–36V DC. (At the moment only the Pololu DRV8825 drivers can handle up to 36V so please consider the operation voltage when powering the board.)
Don’t wait — click here to see more about the Arduino CNC Shield V3.51 and start your next project today!
Easy Pulse Mikro by Embedded Lab

What’s more, the Easy Pulse Mikro is designed in the convenient Mikro bus form factor, making it easy to integrate with a wide range of mikroElektronika’s development boards. With all necessary instrumentation and amplification built right in, this powerful sensor provides a clean and precise analog PPG waveform output that’s routed to the AN pin of the mikroBus connector.
Whether you’re a hobbyist, student, or professional developer, the Easy Pulse mikro is the perfect tool for monitoring heart rate and other vital signs.
Click here to see more about the Easy Pulse mikro.
Features
Compatible with mikroBus socket.
Filtered and amplified analog PPG signal output
On-board potentiometer for adjusting amplifier gain, if needed (rotate clock-wise for increasing gain)
Onboard LED for indicating heartbeat. It flashes synchronously with the heartbeat on detecting the pulse from the fingertip.
2 notes
·
View notes
Text
HOW DO YOU START MAKING A GAME?
hihihihi- I'm adding to this because I want everyone to make games. My current top recommendations for books is A Playful Production Process, Rule of Play is a classic, so is Game Feel
This is long- so get ready
Other engines
Construct 3: Browser based game stuff!
Pulp: Extremely similar to Bitsy- make games for the PlayDate
PICO-8: Make tiny games and programs for a fantasy console!
LÖVE: Lua based 2D game framework!
Scratch: Educational engine, chances are if you're under a certain age you've had a school program use this!
microStudio: More browser based engine stuff!
babylon.js: Open source engine
For games adjacent things like alternative controllers, events, or installations
LIKELIKE online: Arts based open source online art gallery, remixable on glitch- there's even a template
Processing: Open source, 20 years of documentation, and super flexible if you wanna be experimental
Arduino: Make physical games using programming, or robots, or escape rooms!
Makey-Makey: Much simpler plug and play Arduino!
Okay but how do I make a game?
Fast answer- you just start. But a pretty straight forward workflow would be
Write down ideas, make flowcharts of ideas, scripts, mechanical descriptions. From that think of how systems interact
Paper prototype, see what works and doesn't work when playing through things without being restricted to programming
Jam, fail often and fast because each project is a lot like a sketch- they take a long time to do though. the quicker you are to kill your darlings and start anew the faster you'll get better
Do a game deconstruction- break it down into tiny pieces and stare into it. What made it fun? What were the small things that stuck out to you?
"But I want to make a complicated-"
Shhhh- no you don't. You'll burn out. Make the cube move first. Make it jump. Does the jumping feel good? No? Start over. Make the cube move again, but slightly differently- does the jump feel good yet? No? START OVER. As soon as you get stuck, abandon what you're doing and start over
And I'm not kidding, game making is an iterative process. The more projects you do the better, faster, and easier it gets. If you whittle away on something you'll never finish
Okay, jump feels good now, great now interact with something in the scene. So on and so forth until you have scripts you like and understand and these become your building blocks for projects
Make the smallest thing you can- smaller, smallerSMALLER- here's a breakdown of a dating sim game with a final 3-4 hours of content per playthrough, similar to something like Hatoful Boyfriend or Doki Doki Literature Club
Need To Have
Title card and a way to start the game.
A dialogue system including the ability to show text, click on buttons, and track choices.
Includes both NPC and player names along with dialogue.
One dateable character including tracking relationship points with the player, one friendship cutscene, one romantic cutscene, and one final cutscene.
Ending card and credits.
Want To Have
In addition to above:
An option screen that changes basic user interface, save and load system, player name input with pronouns, music volume and quality of life settings, so on.
An external narrative building up the world in which the game is played including a mystery for the player to solve.
Four dateable characters with individual narratives including 3 friendship cutscenes, 3 romantic cutscenes, and a final ending cutscene for each.
A resolution to the mystery.
Dream To Have
In addition to above:
A hidden menu that allows the character to make interesting alterations to the game and becoming the antagonist of the mystery
Mystery narrative is branching with several endings where the player can either fail or succeed without dating any of the characters
Friend only narrative choices and ending.
Two extra gag romance characters with diverge narratives unlike the others in the game
Jealousy/approval between characters depending on narrative choices.
Options to create poly relationships between compatible characters, options to betray or cheat on characters, and options to matchmake characters without dating them.
Multiple endings to resolve the mystery including hidden antagonist role.
I often reference this tiktok on how everything piles up
Game making takes a long time and wildly complex very fast. For my timelines I add a minimum of 3 months for each year.
Quick and dirty advice for once you've got something going
Call your grant officers if you got local funding, it’s their job to answer your questions!
Research the desired outcomes before asking someone for money; be that the government, a publisher, or yourself
Never pay for event submissions or showcases until you’re making significant revenue if you don’t have to, I suggest following Game Conference Guide’s calendar
Even if you’re working for free track your hours and costs so if/when you are making budgets in the future you know how fast you and your team work
Learn when to say something is good enough; cut mechanics or features early and often to avoid the project ballooning out of scope
Don’t quit your day job until it makes sense- it’s more sustainable to work on something without funding if you’re still able to pay your bills
Shipped is the best feature, some great advice from Mark Darrah
Make smaller, shittier, and messier games more often
Go forth, make games, then tell me about them and I'll play them if I can. I love when folks make games- you can do it!

🎮 HEY I WANNA MAKE A GAME! 🎮
Yeah I getcha. I was once like you. Pure and naive. Great news. I AM STILL PURE AND NAIVE, GAME DEV IS FUN! But where to start?
To start, here are a couple of entry level softwares you can use! source: I just made a game called In Stars and Time and people are asking me how to start making vidy gaems. Now, without further ado:
SOFTWARES AND ENGINES FOR PEOPLE WHO DON'T KNOW HOW TO CODE!!!

Ren'py (and also a link to it if you click here do it): THE visual novel software. Comic artists, look no further ✨Pros: It's free! It's simple! It has great documentation! It has a bunch of plugins and UI stuff and assets for you to buy! It can be used even if you have LITERALLY no programming experience! (You'll just need to read the doc a bunch) You can also port your game to a BUNCH of consoles! ✨Cons: None really <3 Some games to look at: Doki Doki Literature Club, Bad End Theater, Butterfly Soup
Twine: Great for text-based games! GREAT FOR WRITERS WHO DONT WANNA DRAW!!!!!!!!! (but you can draw if you want) ✨Pros: It's free! It's simple! It's versatile! It has great documentation! It can be used even if you have LITERALLY no programming experience! (You'll just need to read the doc a bunch) ✨Cons: You can add pictures, but it's a pain. Some games to look at: The Uncle Who Works For Nintendo, Queers In love At The End of The World, Escape Velocity

Bitsy: Little topdown games! ✨Pros: It's free! It's simple! It's (somewhat) intuitive! It has great documentation! It can be used even if you have LITERALLY no programming experience! You can make everything in it, from text to sprites to code! Those games sure are small! ✨Cons: Those games sure are small. This is to make THE simplest game. Barely any animation for your sprites, can barely fit a line of text in there. But honestly, the restrictions are refreshing! Some games to look at: honestly I haven't played that many bitsy games because i am a fake gamer. The picture above is from Under A Star Called Sun though and that looks so pretty

RPGMaker: To make RPGs! LIKE ME!!!!! NOTE: I recommend getting the latest version if you can, but all have their pros and cons. You can get a better idea by looking at this post. ✨Pros: Literally everything you need to make an RPG. Has a tutorial inside the software itself that will teach you the basics. Pretty simple to understand, even if you have no coding experience! Also I made a post helping you out with RPGMaker right here! ✨Cons: Some stuff can be hard to figure out. Also, the latest version is expensive. Get it on sale! Some games to look at: Yume Nikki, Hylics, In Stars and Time (hehe. I made it)

engine.lol: collage worlds! it is relatively new so I don't know much about it, but it seems fascinating. picture is from Garden! NOTE: There's a bunch of smaller engines to find out there. Just yesterday I found out there's an Idle Game Maker made by the Cookie Clicker creator. Isn't life wonderful?
✨more advice under the cut. this is Long ok✨
ENGINES I KNOW NOTHING ABOUT AND THEY SEEM HARD BUT ALSO GIVE IT A TRY I GUESS!!!! :
Unity and Unreal: I don't know anything about those! That looks hard to learn! But indie devs use them! It seems expensive! Follow your dreams though! Don't ask me how!
GameMaker: Wuh I just don't know anything about it either! I just know it's now free if your game is non-commercial (aka, you're not selling it), and Undertale was made on it! It seems good! You probably need some coding experience though!!!
Godot: Man I know even less about this one. Heard good things though!
BUNCHA RANDOM ADVICE!!!!
-Make something small first! Try making simple: a character is in a room, and exits the room. The character can look around, decide to take an item with them, can leave, and maybe the door is locked and you have to find the key. Figuring out how to code something like that, whether it is as a fully text-based game or as an RPGMaker map, should be a good start to figure out how your software of choice works!
-After that, if you have an idea, try first to make the simplest version of that idea. For my timeloop RPG, my simplest version was two rooms: first room you can walk in, second room with the King, where a cutscene automatically plays and the battle starts, you immediately die, and loop back to the first room, with the text from this point on reflecting this change. I think I also added a loop counter. This helped me figure out the most important thing: Can This Game Be Made? After that, the rest is just fun stuff. So if you want to make a dating sim, try and figure out how to add choices, and how to have affection points go up and down depending on your choices! If you want to make a platformer, figure out how to make your character move and jump and how to create a simple level! If you just want to make a kinetic visual novel with no choices, figure out how to add text, and how to add portraits! You'll be surprised at how powerful you'll feel after having figured even those simple things out.
-If you have a programming problem or just get confused, never underestimate the power of asking Google! You most likely won't be the only person asking this question, and you will learn some useful tips! If you are powerful enough, you can even… Ask people??? On forums??? Not me though.
-Yeah I know you probably want to make Your Big Idea RIGHT NOW but please. Make a smaller prototype first. You need to get that experience. Trust me.
-If you are not a womanthing of many skills like me, you might realize you need help. Maybe you need an artist, or a programmer. So! Game jams on itch.io are a great way to get to work and meet other game devs that have different strengths! Or ask around! Maybe your artist friend secretly always wanted to draw for a game. Ask! Collaborate! Have fun!!!
I hope that was useful! If it was. Maybe. You'd like to buy me a coffee. Or maybe you could check out my comics and games. Or just my new critically acclaimed game In Stars and Time. If you want. Ok bye
#game stuff#please let me play your games#send them to festivals#okay tyty#i go back to making my jam game
36K notes
·
View notes